Integration with Llamalitica
This document describes the integration process with Llamalitica using our REST API and the platform redirect system. This method provides a simple and efficient way to integrate Llamalitica's capabilities into your software.
The integration is performed in three main steps:
- Obtaining the user token through impersonation
- Creating a case with patient data and documents
- Redirecting to the Llamalitica platform
Before starting the technical integration, we recommend reading the Hierarchy, Organizations, and Agents Guide to understand Llamalitica's organizational model.
Initial Setup
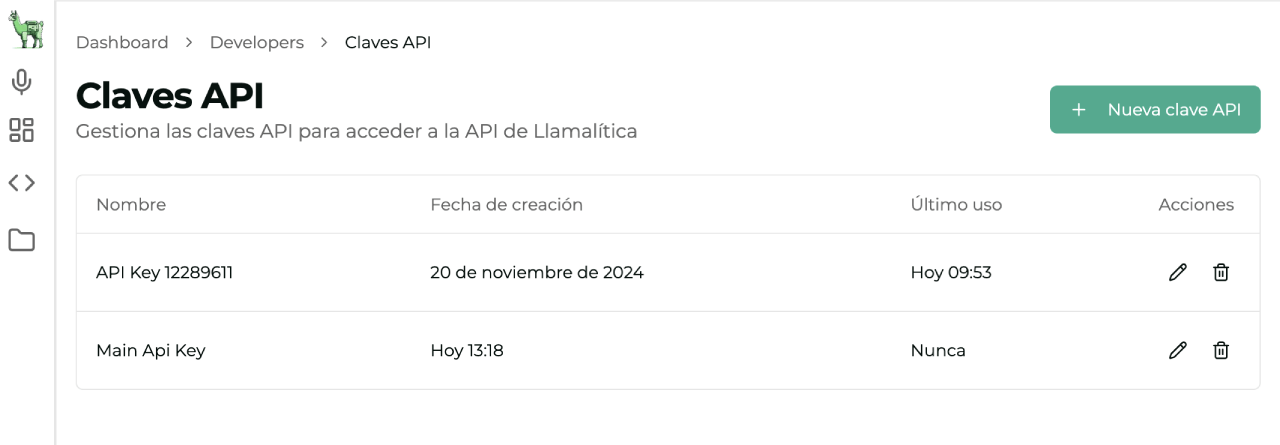
1. Obtaining an API Key
To get your API Key, access the developer panel under Developers -> API Keys. This API Key is required for all interactions with the Llamalitica API.
- api.llamalitica.com: Domain for all REST API calls
- llamalitica.com: Domain for the web interface and control panel
If your infrastructure requires data traffic to flow exclusively through a point-to-point VPN instead of the public internet, we can configure a dedicated tunnel that routes communication directly to Llamalitica.
This option is ideal for organizations with strict security policies or regulatory compliance requirements that mandate private connections.
Interested? Contact our team to assess your case and configure the VPN connection.
Once the VPN is established, you will need to update the domains in your integration:
| Public connection | Private VPN connection |
|---|---|
llamalitica.com | private.llamalitica.com |
api.llamalitica.com | api.private.llamalitica.com |
Simply replace all references to public domains with their private equivalents in your integration code.
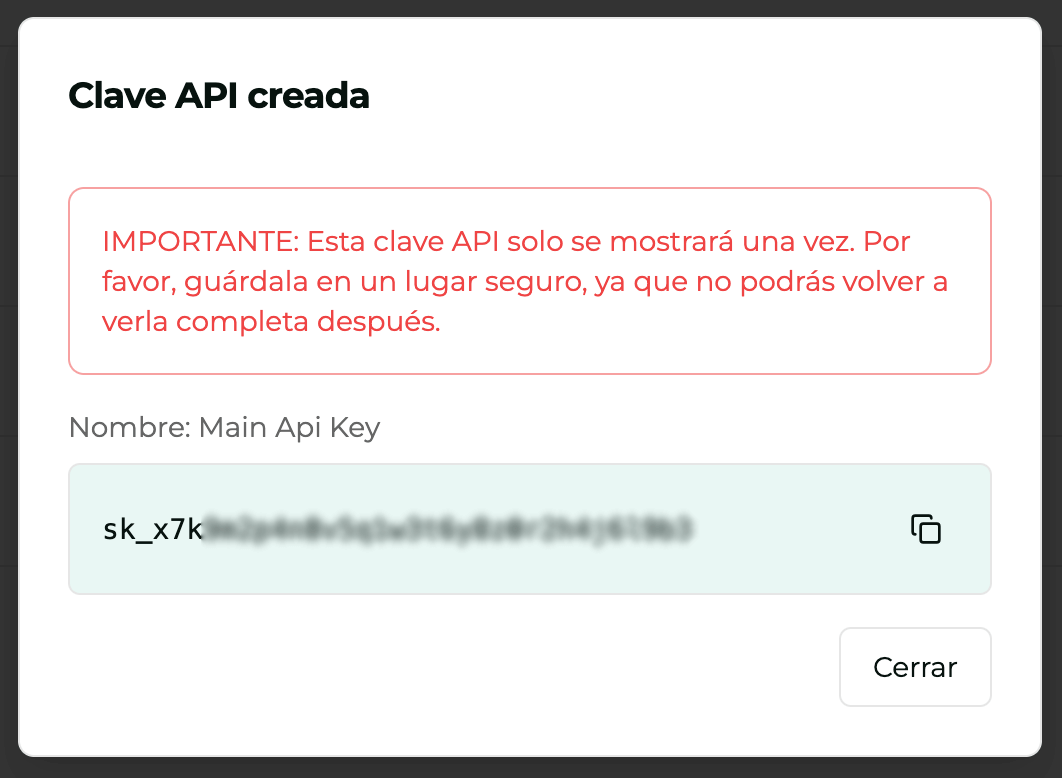
Secure Storage of the API Key
It is essential to store the API Key securely to prevent leaks and unauthorized access. Here are some recommendations for handling it:
-
Server-side storage: The API Key must never be exposed in the frontend. It must be stored on the server, preferably in environment variables or a secrets management system.
-
Key rotation: If you suspect the API Key has been compromised, it is crucial to delete the current key and generate a new one.
-
Use HTTPS: Ensure that all communications involving the API Key are performed over HTTPS to protect information in transit.
-
Principle of Least Privilege: Limit access to the API Key only to those services and users who truly need it. This reduces the risk of exposure.
2. Configuring Webhooks
Webhooks allow you to receive real-time notifications about events on the platform.
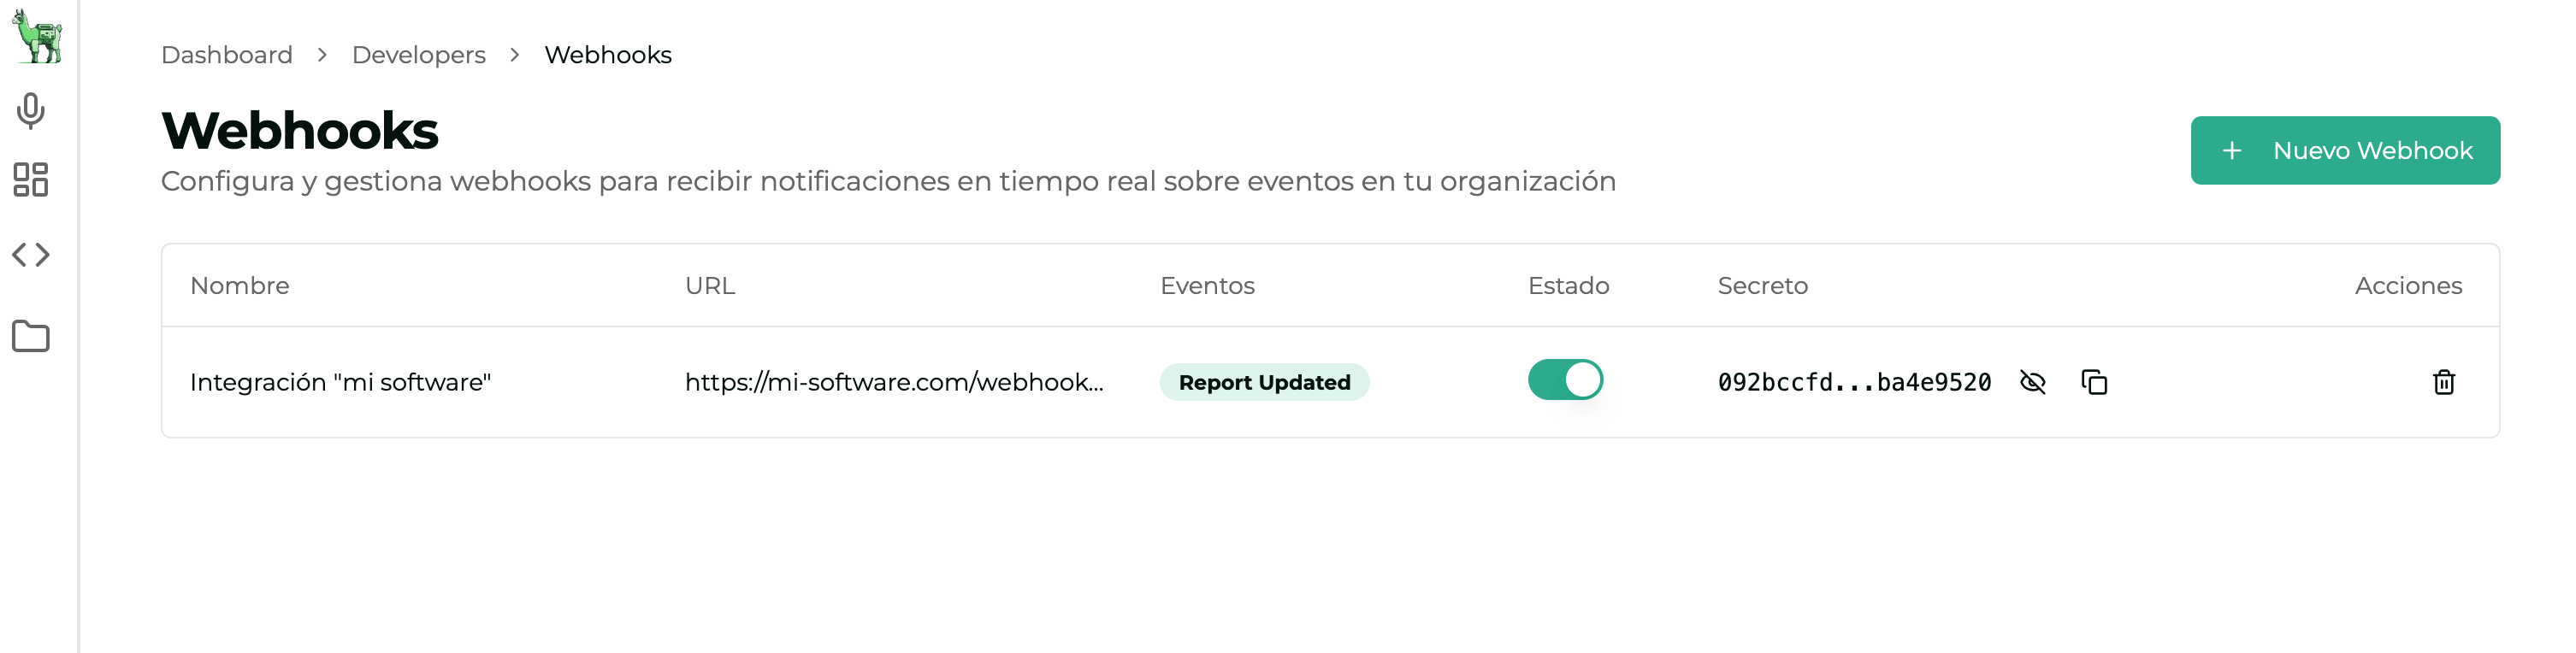
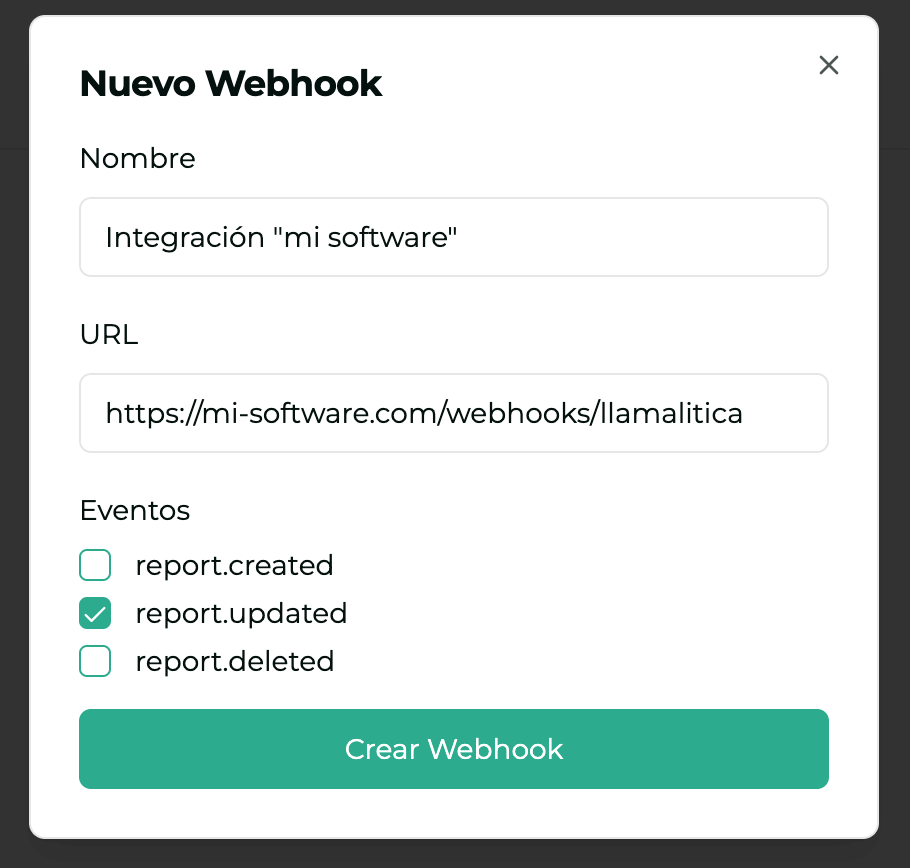
Configure your webhooks under Developers -> Webhooks. Here you can:
- Specify your endpoint URL
- Select the events you want to receive:
report.created: Fired when the AI agent initially generates a report, without any review or modification by the professional.report.updated: Fired each time the professional saves changes to the report.report.deleted: Fired when a report is deleted from the timeline.
- Obtain the secret for validating webhook signatures
Step-by-Step Integration Process
Step 1: Obtaining the User Token
The first step is to obtain a user token through the authentication endpoint. This token will be required for all subsequent operations.
This involves user impersonation to obtain their access token, using your organization API Key and the email of the user to authenticate.
Authentication Endpoint
GET /api/users/me
X-API-KEY: {your-api-key}               # Required: Your Llamalitica API Key
X-USER-EMAIL: {user-email}              # Required: Email of the user to authenticate
X-ORGANIZATION: {sub-organization-id}   # Optional: Sub-organization ID
If the user or sub-organization does not exist, it will be created automatically. The user will be linked to the specified organization.
Implementation Examples
View example in TypeScript (Backend)
import axios from 'axios';

type LlamaliticaUser = {
  accessToken: string;
  id: string;
  email: string;
  name: string;
  organization: {
    id: string;
    name: string;
    settings: Record<string, any>;
  };
  specialities: string[];
  agents: Array<{
    id: string;
    name: string;
    description: string;
    type: string;
  }>;
};

async function getUserToken(
  apiKey: string,
  userEmail: string,
  organizationId?: string,
): Promise<LlamaliticaUser> {
  const headers: Record<string, string> = {
    'X-API-KEY': apiKey,
    'X-USER-EMAIL': userEmail,
    'Content-Type': 'application/json',
  };

  if (organizationId) {
    headers['X-ORGANIZATION'] = organizationId;
  }

  try {
    const response = await axios.get<{ user: LlamaliticaUser }>(
      'https://api.llamalitica.com/api/users/me',
      { headers },
    );

    return response.data.user;
  } catch (error) {
    if (axios.isAxiosError(error)) {
      if (error.response?.status === 401) {
        throw new Error('Invalid API Key or email');
      }
      throw new Error(
        `Error obtaining token: ${error.response?.data?.message || error.message}`,
      );
    }
    throw error;
  }
}
View example in PHP
<?php

class LlamaliticaService {
    private string $apiKey;
    private \GuzzleHttp\Client $client;

    public function __construct(string $apiKey) {
        $this->apiKey = $apiKey;
        $this->client = new \GuzzleHttp\Client([
            'base_uri' => 'https://api.llamalitica.com'
        ]);
    }

    /**
     * Get user token
     *
     * @param string $userEmail User email
     * @param string|null $organizationId Organization ID (optional)
     * @return array User data including the token
     * @throws \Exception
     */
    public function getUserToken(string $userEmail, ?string $organizationId = null): array {
        try {
            $headers = [
                'X-API-KEY' => $this->apiKey,
                'X-USER-EMAIL' => $userEmail,
                'Content-Type' => 'application/json'
            ];

            if ($organizationId) {
                $headers['X-ORGANIZATION'] = $organizationId;
            }

            $response = $this->client->get('/api/users/me', [
                'headers' => $headers
            ]);

            return json_decode($response->getBody()->getContents(), true)['user'];
        } catch (\GuzzleHttp\Exception\ClientException $e) {
            if ($e->getResponse()->getStatusCode() === 401) {
                throw new \Exception('Invalid API Key or email');
            }
            throw new \Exception('Error obtaining token: ' . $e->getMessage());
        }
    }
}
View example in Python
from dataclasses import dataclass
from typing import List, Dict, Optional
import httpx
from pathlib import Path

@dataclass
class CaseFile:
    path: Path
    name: str
    type: str

class CaseService:
    def __init__(self, api_key: str):
        self.api_key = api_key
        self.base_url = "https://api.llamalitica.com"

    async def get_user_token(
        self,
        user_email: str,
        organization_id: Optional[str] = None
    ) -> Dict:
        """
        Get Llamalitica user token

        Args:
            user_email: User email
            organization_id: Organization ID (optional)

        Returns:
            Dict: User data including the token

        Raises:
            Exception: If there is an error in the request
        """
        headers = {
            "X-API-KEY": self.api_key,
            "X-USER-EMAIL": user_email,
            "Content-Type": "application/json"
        }

        if organization_id:
            headers["X-ORGANIZATION"] = organization_id

        async with httpx.AsyncClient() as client:
            try:
                response = await client.get(
                    f"{self.base_url}/api/users/me",
                    headers=headers
                )
                response.raise_for_status()
                return response.json()["user"]
            except httpx.HTTPStatusError as e:
                if e.response.status_code == 401:
                    raise ValueError("Invalid API Key or email")
                raise ValueError(f"Error obtaining token: {e.response.text}")
Authentication Response
{
  "user": {
    "accessToken": "eyJhbGciOiJIUzI1NiIs...", // JWT token for use in subsequent requests
    "id": "user-uuid", // Unique user ID
    "email": "user@example.com", // User email
    "name": "User Name", // User name
    "organization": {
      "id": "org-uuid", // Organization ID
      "name": "Organization Name", // Organization name
      "settings": {
        // Organization settings
        // ... configuration details
      }
    },
    "specialities": ["specialty1", "specialty2"], // User specialties
    "agents": [
      // Agents available to the user
      {
        "id": "agent-uuid",
        "name": "Agent Name",
        "description": "Agent description",
        "type": "report"
      }
    ]
  }
}
Step 2: Creating the Case
Once the user is authenticated, we proceed to create a new clinical case. This step allows you to send both patient data and associated documents.
Case Creation Endpoint
Interactive documentation for the case creation endpoint
POST /api/cases
Content-Type: multipart/form-data
Form Parameters
-
patientMetadata (required): JSON object with patient data
{"id": "internal-patient-id", // Your internal patient ID"name": "Patient Name", // Name that will appear on the case"other-clinical-data": {// Optional: Any additional data"age": 45,"gender": "M","allergies": ["penicillin"],"conditions": ["hypertension"]}} -
files (optional): Array of files to process
- Any supported format: PDF, DOCX, TXT, MP3, MP4, WAV, etc.
- Recommended maximum size: 10MB per file
- No limit on the number of files per case
Implementation Examples
View example in TypeScript (Backend)
import axios from 'axios';
import FormData from 'form-data';
import { createReadStream } from 'node:fs';

type PatientMetadata = {
  id: string;
  name: string;
  [key: string]: any;
};

type CaseFile = {
  path: string;
  name: string;
  type: string;
};

async function createCase(
  apiKey: string,
  userEmail: string,
  patientData: PatientMetadata,
  files: CaseFile[],
): Promise<{
  caseId: string;
  patientId: string;
  title: string;
  createdAt: string;
  files: Array<{
    id: string;
    name: string;
    type: string;
    size: number;
    status: string;
    addedAt: string;
  }>;
}> {
  const formData = new FormData();

  // Add patient metadata
  formData.append('patientMetadata', JSON.stringify(patientData));

  // Add files
  files.forEach((file) => {
    formData.append('files', createReadStream(file.path), {
      filename: file.name,
      contentType: file.type,
    });
  });

  try {
    const response = await axios.post(
      'https://api.llamalitica.com/api/cases',
      formData,
      {
        headers: {
          'X-API-KEY': apiKey,
          'X-USER-EMAIL': userEmail,
          ...formData.getHeaders(),
        },
      },
    );

    return response.data;
  } catch (error) {
    if (axios.isAxiosError(error)) {
      throw new Error(
        `Error creating case: ${error.response?.data?.message || error.message}`,
      );
    }
    throw error;
  }
}
View example in PHP
<?php

class CaseService {
    private string $apiKey;
    private \GuzzleHttp\Client $client;

    public function __construct(string $apiKey) {
        $this->apiKey = $apiKey;
        $this->client = new \GuzzleHttp\Client([
            'base_uri' => 'https://api.llamalitica.com'
        ]);
    }

    /**
     * Create a new case
     *
     * @param string $userEmail User email
     * @param array $patientData Patient data
     * @param array $files Array of files [['path' => string, 'name' => string]]
     * @return array Created case data
     * @throws \Exception
     */
    public function createCase(
        string $userEmail,
        array $patientData,
        array $files = []
    ): array {
        try {
            $multipart = [
                [
                    'name' => 'patientMetadata',
                    'contents' => json_encode($patientData)
                ]
            ];

            foreach ($files as $file) {
                $multipart[] = [
                    'name' => 'files',
                    'contents' => fopen($file['path'], 'r'),
                    'filename' => $file['name']
                ];
            }

            $response = $this->client->post('/api/cases', [
                'multipart' => $multipart,
                'headers' => [
                    'X-API-KEY' => $this->apiKey,
                    'X-USER-EMAIL' => $userEmail
                ]
            ]);

            return json_decode($response->getBody()->getContents(), true);
        } catch (\Exception $e) {
            throw new \Exception('Error creating case: ' . $e->getMessage());
        }
    }
}
View example in Python
from dataclasses import dataclass
from typing import List, Dict, Optional
import httpx
from pathlib import Path

@dataclass
class CaseFile:
    path: Path
    name: str
    type: str

class CaseService:
    def __init__(self, api_key: str):
        self.api_key = api_key
        self.base_url = "https://api.llamalitica.com"

    async def create_case(
        self,
        user_email: str,
        patient_data: Dict,
        files: Optional[List[CaseFile]] = None
    ) -> Dict:
        """
        Create a new case

        Args:
            user_email: User email
            patient_data: Patient data
            files: Optional list of files to process

        Returns:
            Dict: Created case data

        Raises:
            Exception: If there is an error in the request
        """
        files = files or []

        # Prepare multipart form
        form = {
            'patientMetadata': (
                None,
                json.dumps(patient_data),
                'application/json'
            )
        }

        # Add files
        for i, file in enumerate(files):
            form[f'files'] = (
                file.name,
                file.path.read_bytes(),
                file.type
            )

        headers = {
            'X-API-KEY': self.api_key,
            'X-USER-EMAIL': user_email
        }

        async with httpx.AsyncClient() as client:
            try:
                response = await client.post(
                    f"{self.base_url}/api/cases",
                    files=form,
                    headers=headers
                )
                response.raise_for_status()
                return response.json()
            except httpx.HTTPError as e:
                raise Exception(f"Error creating case: {str(e)}")
Step 3: Redirecting to Llamalitica
Once you have the case ID, you can redirect the user to the Llamalitica platform. The redirect goes to the web interface domain. A minimalist widget is also available that only shows the audio recording option.
A visual interface is available to test different configurations from our developer tools -> Integrations.
Base URL and Configuration
Case Page
https://llamalitica.com/dashboard/cases/{caseId}?config={configBase64}
The configuration is sent as a base64-encoded JSON object in the config parameter:
{
  "accessToken": "{accessToken}", // Access token obtained in step 1
  "redirectUrl": "{returnUrl}", // URL to redirect to after saving
  "ui": {
    "showSidebar": true, // Show sidebar
    "showUploadButton": true, // Allow file uploads
    "showAudioRecorder": true, // Show audio recorder
    "showThemeToggle": true, // Allow theme switching
    "showChat": true, // Show chat with history
    "showEditorAIButton": true, // Show AI button in editor
    "showPdfDownloadButton": true, // Allow PDF download
    "saveAndFinishText": "Save and finish", // Text for the "Save and finish" button
    "defaultAgent": {
      // Default agent to run
      "id": "{agent-uuid}",
      "when": "afterLoad" // 'afterLoad' or 'afterStopRecording'
    },
    "availableAgents": ["agent-uuid-1", "agent-uuid-2"], // Optional array of available agent UUIDs
    "telemedicine": {
      // Telemedicine recorder mode configuration (optional)
      "captureSurface": "fullPicker", // 'currentTab' or 'fullPicker'
      "enabledByDefault": false // Start already in telemedicine mode
    },
    "colors": {
      "primary": "#000000", // Primary interface color
      "foreground": "#ffffff", // Foreground color
      "background": "#f0f0f0" // Background color
    }
  }
}
Mini Audio Widget
In this widget, a report will be generated automatically when the audio recording ends.
https://llamalitica.com/dashboard/cases/{caseId}/mini-widget?config={configBase64}
The configuration is sent as a base64-encoded JSON object in the config parameter:
{
  "accessToken": "{accessToken}", // Access token obtained in step 1
  "redirectUrl": "{returnUrl}", // URL to redirect to after saving
  "ui": {
    "defaultAgent": {
      // Default agent to run
      "id": "{agent-uuid}"
    },
    "telemedicine": {
      // Optional: also captures audio from the video call
      "enabledByDefault": true, // Starts recording tab + microphone
      "captureSurface": "currentTab" // Direct capture of the current tab (1 click)
    }
  }
}
If the video call (TokBox, Twilio, etc.) lives in the same tab that embeds the widget, use "captureSurface": "currentTab" so the recorder captures the current tab without showing the full browser picker. More details in Telemedicine Mode.
Embedded Chat Widget (iframe)
Integrate the chat of a case directly into your application via an <iframe>. In this mode only the chat is shown, without a sidebar or additional controls.
https://llamalitica.com/dashboard/cases/{caseId}?config={configBase64}
The minimum required configuration is:
{
  "accessToken": "{accessToken}",
  "ui": {
    "chatOnly": true
  }
}
With chatOnly: true no other ui parameters need to be specified.
Example usage with iframe:
<iframe
  src="https://llamalitica.com/dashboard/cases/{caseId}?config={configBase64}"
  width="400"
  height="600"
  style="border: none; border-radius: 8px"
  allow="microphone" />
You can generate the URL and preview the widget from Developers → Integrations → Embedded Chat.
The widget configuration is stored in the browser's sessionStorage, so it only affects the tab where the embed was opened. Other tabs of the application are not modified, and when the tab is closed the configuration is automatically removed.
Important considerations about the UI configuration
ui object parametersAll parameters within the ui object are completely optional. If any of them is not provided, the platform will use default values, offering a standard user experience.
Color customization
- The
colorsobject allows you to customize the interface colors - Important: When providing a custom color configuration, the option to toggle between light and dark themes on the platform will be automatically disabled
- If you want to keep the theme-switching functionality, omit the
colorsobject from the configuration
"Save and finish" button text
The saveAndFinishText parameter allows you to customize the save button text in the report editor when in integrated mode.
The button behavior depends on the configuration:
| Scenario | Text shown |
|---|---|
Without redirectUrl (standard mode) | "Save" (default translation) |
With redirectUrl and without saveAndFinishText | "Save and finish" (default translation) |
With redirectUrl and saveAndFinishText defined | The exact value sent in saveAndFinishText |
- Optional: if not provided, the default translation for the user's language is used.
- Only applies in integrated mode: the parameter only takes effect when there is a
redirectUrldefined in the configuration. In standard mode (withoutredirectUrl) the button always shows"Save"regardless of the value sent. - Type:
string. The value is inserted as-is, without translation or interpolation, so it must be sent already localized if the integration is multi-language. - Typical use case: aligning the button text with the client software's terminology, for example
"Send to EHR","Sign and send", or"Return to clinical history".
{
  "accessToken": "{accessToken}",
  "redirectUrl": "https://my-software.com/return",
  "ui": {
    "saveAndFinishText": "Send to EHR"
  }
}
Default agent configuration
The defaultAgent object allows you to specify which agent will run automatically:
id: Must be a valid identifier of an agent available to the userwhen: Defines when the agent will run automatically:afterLoad: Immediately after the case is loadedafterStopRecording: After stopping an audio recording
Recommendation: It is advised not to specify this parameter to allow the user to decide which agent to use and when to run it, thus improving the user experience and avoiding unexpected behavior.
Available agents control
The availableAgents parameter allows you to restrict which agents appear in the report editor dropdown. It works with a 3-level filtering system:
- Level 1 - Organization agents: All agents the organization has available
- Level 2 - User favorite agents: Only the agents the user has marked as favorites
- Level 3 -
availableAgents: If this array is provided, only the favorite agents included in this array will be shown
Example: If a user has 5 favorite agents (["agent-1", "agent-2", "agent-3", "agent-4", "agent-5"]) and you define availableAgents: ["agent-2", "agent-4"], only agent-2 and agent-4 will appear in the dropdown.
- Optional: If this parameter is not provided, all the user's favorite agents will be shown (default behavior)
- Format: Array of strings, where each string is the UUID of an agent
- Recommendation: Use it when you need to restrict available options based on the integration context or specific client configuration
Telemedicine mode (telemedicine)
The telemedicine object controls the recorder behavior when you also want to capture the audio from the video call (browser tab) in addition to the professional's microphone. It is especially useful for embedded teleconsultation integrations (mini-widget inside the tab that hosts the video call).
{
  "accessToken": "{accessToken}",
  "ui": {
    "telemedicine": {
      "captureSurface": "currentTab",
      "enabledByDefault": true
    }
  }
}
| Property | Type | Default | Description |
|---|---|---|---|
captureSurface | 'currentTab' | 'fullPicker' | 'fullPicker' | How capture is offered when starting the recording. |
enabledByDefault | boolean | false | If true, the recorder starts already in telemedicine mode without any user action required. |
captureSurface:
'currentTab': captures the current tab directly via a simplified single-click dialog. Recommended for the embedded mini-widget, where the video call lives in the same tab as the widget.'fullPicker'(default): shows the browser's full native picker with tabs, windows, and applications, so the user can choose the source (for example, if the video call is in another tab or application).
Telemedicine mode is only available in desktop Chromium browsers (Google Chrome and Microsoft Edge). In Firefox, Safari, and on mobile devices the button is not shown and the recorder uses only the microphone.
- Optional: if you do not send the
telemedicineobject, the recorder works in microphone mode and the user activates telemedicine manually with the corresponding button, preserving their preference between sessions. - Reserve
enabledByDefault: truefor teleconsultation workflows where you always want to capture the video call, preventing the professional from forgetting to enable it.
Base64 Encoding Examples
Base64 encoding is required to send the configuration safely in the URL. Here are examples of how to do it in different languages:
View base64 encoding example in JavaScript/TypeScript
import { encode as base64Encode } from 'base64url';

function generateRedirectUrl(
  caseId: string,
  accessToken: string,
  redirectUrl: string,
): string {
  const config = {
    accessToken,
    redirectUrl,
    ui: {
      showSidebar: true,
      showUploadButton: true,
      showEditorAIButton: true,
      defaultAgent: {
        id: 'agent-uuid',
        when: 'afterLoad',
      },
      colors: {
        primary: '#4a90e2',
        foreground: '#333333',
        background: '#f5f5f5',
      },
    },
  };

  const configBase64 = base64Encode(JSON.stringify(config));
  return `https://llamalitica.com/dashboard/cases/${caseId}?config=${configBase64}`;
}
View base64 encoding example in PHP
function generateRedirectUrl(
    string $caseId,
    string $accessToken,
    string $redirectUrl
): string {
    $config = [
        'accessToken' => $accessToken,
        'redirectUrl' => $redirectUrl,
        'ui' => [
            'showSidebar' => true,
            'showUploadButton' => true,
            'showEditorAIButton' => true,
            'defaultAgent' => [
                'id' => 'agent-uuid',
                'when' => 'afterLoad'
            ],
            'colors' => [
                'primary' => '#4a90e2',
                'foreground' => '#333333',
                'background' => '#f5f5f5'
            ]
        ]
    ];

    $configBase64 = base64_encode(json_encode($config));
    return sprintf(
        'https://llamalitica.com/dashboard/cases/%s?config=%s',
        $caseId,
        urlencode($configBase64)
    );
}
View base64 encoding example in Python
import base64
import json
from urllib.parse import quote

def generate_redirect_url(case_id: str, access_token: str, redirect_url: str) -> str:
    """Generates the redirect URL to Llamalitica"""
    config = {
        'accessToken': access_token,
        'redirectUrl': redirect_url,
        'ui': {
            'showSidebar': True,
            'showUploadButton': True,
            'showEditorAIButton': True,
            'defaultAgent': {
                'id': 'agent-uuid',
                'when': 'afterLoad'
            },
            'colors': {
                'primary': '#4a90e2',
                'foreground': '#333333',
                'background': '#f5f5f5'
            }
        }
    }

    config_json = json.dumps(config)
    config_base64 = base64.b64encode(config_json.encode()).decode()
    return f"https://llamalitica.com/dashboard/cases/{case_id}?config={quote(config_base64)}"
View base64 encoding example in Go
package base64helper

import (
    "encoding/base64"
    "encoding/json"
    "net/url"
    "fmt"
)

// Example usage with the updated configuration
func buildRedirectUrl(caseId string, accessToken string, redirectUrl string) (string, error) {
    config := map[string]interface{}{
        "accessToken": accessToken,
        "redirectUrl": redirectUrl,
        "ui": map[string]interface{}{
            "showSidebar": true,
            "showUploadButton": true,
            "showEditorAIButton": true,
            "defaultAgent": map[string]interface{}{
                "id": "agent-uuid",
                "when": "afterLoad",
            },
            "colors": map[string]interface{}{
                "primary": "#4a90e2",
                "foreground": "#333333",
                "background": "#f5f5f5",
            },
        },
    }

    encodedConfig, err := encodeConfigForUrl(config)
    if err != nil {
        return "", err
    }

    return fmt.Sprintf(
        "https://llamalitica.com/dashboard/cases/%s?config=%s",
        caseId,
        encodedConfig,
    ), nil
}

func encodeConfigForUrl(config interface{}) (string, error) {
    jsonBytes, err := json.Marshal(config)
    if err != nil {
        return "", err
    }

    base64Str := base64.StdEncoding.EncodeToString(jsonBytes)
    return url.QueryEscape(base64Str), nil
}
View base64 encoding example in Java
import java.util.Base64;
import java.net.URLEncoder;
import java.nio.charset.StandardCharsets;
import com.fasterxml.jackson.databind.ObjectMapper;
import java.util.HashMap;
import java.util.Map;

public class ConfigEncoder {
    private final ObjectMapper objectMapper = new ObjectMapper();

    public String encodeConfigForUrl(Object config) throws Exception {
        // Convert to JSON, then to base64, and finally URL-encode
        byte[] jsonBytes = objectMapper.writeValueAsBytes(config);
        String base64 = Base64.getEncoder().encodeToString(jsonBytes);
        return URLEncoder.encode(base64, StandardCharsets.UTF_8.toString());
    }

    // Example usage with the updated configuration
    public String buildRedirectUrl(String caseId, String accessToken, String redirectUrl)
        throws Exception {

        Map<String, Object> colors = new HashMap<>();
        colors.put("primary", "#4a90e2");
        colors.put("foreground", "#333333");
        colors.put("background", "#f5f5f5");

        Map<String, Object> defaultAgent = new HashMap<>();
        defaultAgent.put("id", "agent-uuid");
        defaultAgent.put("when", "afterLoad");

        Map<String, Object> ui = new HashMap<>();
        ui.put("showSidebar", true);
        ui.put("showUploadButton", true);
        ui.put("showEditorAIButton", true);
        ui.put("defaultAgent", defaultAgent);
        ui.put("colors", colors);

        Map<String, Object> config = new HashMap<>();
        config.put("accessToken", accessToken);
        config.put("redirectUrl", redirectUrl);
        config.put("ui", ui);

        String encodedConfig = encodeConfigForUrl(config);
        return String.format(
            "https://llamalitica.com/dashboard/cases/%s?config=%s",
            caseId,
            encodedConfig
        );
    }
}
View base64 encoding example in C#
using System.Text;
using System.Text.Json;
using System.Web;
using System.Collections.Generic;

public class ConfigEncoder
{
    public string EncodeConfigForUrl<T>(T config)
    {
        // Convert to JSON, then to base64, and finally URL-encode
        var json = JsonSerializer.Serialize(config);
        var base64 = Convert.ToBase64String(
            Encoding.UTF8.GetBytes(json)
        );
        return HttpUtility.UrlEncode(base64);
    }

    // Example usage with the updated configuration
    public string BuildRedirectUrl(string caseId, string accessToken, string redirectUrl)
    {
        var config = new Dictionary<string, object>
        {
            ["accessToken"] = accessToken,
            ["redirectUrl"] = redirectUrl,
            ["ui"] = new Dictionary<string, object>
            {
                ["showSidebar"] = true,
                ["showUploadButton"] = true,
                ["showEditorAIButton"] = true,
                ["defaultAgent"] = new Dictionary<string, object>
                {
                    ["id"] = "agent-uuid",
                    ["when"] = "afterLoad"
                },
                ["colors"] = new Dictionary<string, object>
                {
                    ["primary"] = "#4a90e2",
                    ["foreground"] = "#333333",
                    ["background"] = "#f5f5f5"
                }
            }
        };

        var encodedConfig = EncodeConfigForUrl(config);
        return $"https://llamalitica.com/dashboard/cases/{caseId}?config={encodedConfig}";
    }
}
Event Management
Once the user is on the Llamalitica platform, they can perform various actions that will generate events. These events will be sent to your configured webhook.
Event Format
Each event sent to your webhook will have the following structure:
{
  "event": "report.created", // Event type
  "organizationId": "org-uuid", // Organization ID
  "timestamp": "2024-03-21T10:00:00Z", // Event date and time
  "data": {
    "id": "report-uuid", // Report ID
    "caseId": "case-uuid", // Case ID
    "agent": {
      "id": "agent-uuid", // ID of the agent used
      "name": "Agent Name" // Agent name
    },
    "content": "Report content", // Generated content
    "structuredData": {
      // Structured report information
      // ... structure according to the selected agent
    }
  }
}
Event Validation
To ensure the security of your application, it is essential to verify that the events you receive actually come from Llamalitica. This is especially important because webhooks are public endpoints that could be targets of attacks.
How does validation work?
- When you configure a webhook, Llamalitica provides you with a unique secret
- Each time we send an event to your webhook, we include a signature in the
X-Webhook-Signatureheader - This signature is generated using your secret and the event content
- Your application must validate this signature to ensure the event is authentic
Step-by-step example
-
Get the event signature:
- The signature comes in the
X-Webhook-Signatureheader - It is a hexadecimal string
- The signature comes in the
-
Generate the expected signature:
- Take the event body (the complete JSON)
- Use your webhook secret to create an HMAC SHA-256 hash
- Convert the result to hexadecimal format
-
Compare the signatures:
- If the signatures match, the event is authentic
- If they do not match, you must reject the event
Implementation examples
View example in TypeScript
import crypto from 'node:crypto';

function validateWebhookSignature(
  webhookSecret: string,
  payload: unknown,
  receivedSignature: string,
): boolean {
  // Create an HMAC hash using the secret
  const hmac = crypto.createHmac('sha256', webhookSecret);

  // Add the payload to the hash
  hmac.update(JSON.stringify(payload));

  // Generate the expected signature
  const expectedSignature = hmac.digest('hex');

  // Compare with the received signature
  return crypto.timingSafeEqual(
    Buffer.from(expectedSignature),
    Buffer.from(receivedSignature),
  );
}

// Example usage in Express
app.post('/webhook', (req, res) => {
  const signature = req.headers['x-webhook-signature'];

  if (!signature || typeof signature !== 'string') {
    return res.status(401).json({ error: 'Signature not provided' });
  }

  const isValid = validateWebhookSignature(
    process.env.WEBHOOK_SECRET!,
    req.body,
    signature,
  );

  if (!isValid) {
    return res.status(401).json({ error: 'Invalid signature' });
  }

  // Event is valid, process according to its type
  const { event, data } = req.body;

  switch (event) {
    case 'report.created':
      // Handle report creation (initially generated by AI)
      break;
    case 'report.updated':
      // Handle report update (saved by the professional)
      break;
    case 'report.deleted':
      // Handle report deletion (removed from timeline)
      break;
  }

  res.json({ received: true });
});
View example in PHP
function validateWebhookSignature(
    string $webhookSecret,
    string $payload,
    string $receivedSignature
): bool {
    // Generate the expected signature
    $expectedSignature = hash_hmac(
        'sha256',
        $payload,
        $webhookSecret
    );

    // Compare with the received signature
    return hash_equals($expectedSignature, $receivedSignature);
}

// Example usage
$payload = file_get_contents('php://input');
$signature = $_SERVER['HTTP_X_WEBHOOK_SIGNATURE'] ?? '';

if (!validateWebhookSignature(
    $_ENV['WEBHOOK_SECRET'],
    $payload,
    $signature
)) {
    http_response_code(401);
    echo json_encode(['error' => 'Invalid signature']);
    exit;
}

// Event is valid, process it
$event = json_decode($payload, true);
// ... process the event
View example in Python
import hmac
import hashlib
from fastapi import FastAPI, Request, HTTPException
from typing import Dict

app = FastAPI()

def validate_webhook_signature(
    webhook_secret: str,
    payload: bytes,
    received_signature: str
) -> bool:
    """Validates the signature of a webhook event"""
    # Generate the expected signature
    expected_signature = hmac.new(
        webhook_secret.encode(),
        payload,
        hashlib.sha256
    ).hexdigest()

    # Compare with the received signature
    return hmac.compare_digest(
        expected_signature,
        received_signature
    )

@app.post("/webhook")
async def webhook(request: Request):
    # Get the signature from the header
    signature = request.headers.get("x-webhook-signature")
    if not signature:
        raise HTTPException(401, "Signature not provided")

    # Read the payload as bytes
    payload = await request.body()

    # Validate the signature
    if not validate_webhook_signature(
        webhook_secret="your-secret-here",
        payload=payload,
        received_signature=signature
    ):
        raise HTTPException(401, "Invalid signature")

    # Event is valid, process it
    event = await request.json()
    # ... process the event

    return {"received": True}
- Use timing-safe comparison to protect against timing attacks (such as
crypto.timingSafeEqualorhash_equals) - Store the webhook secret securely (environment variables, secrets manager, etc.)
- Reject events without a signature or with an invalid signature
Security Considerations
-
API Key:
- Store the API Key securely in environment variables
- Never expose it in the frontend or in public code
- Rotate the key periodically or if you suspect it has been compromised
-
Webhooks:
- Always validate the signature of received events
- Use HTTPS for your webhook endpoint
-
User Tokens:
- Tokens are temporary and specific to each session
Frequently Asked Questions
How do I get the required credentials?
- Request developer access from our website
- Once your request is approved, you will have access to the developer section
- In the developer panel you can:
- Generate and manage your API Keys
- Configure webhooks
- Access the complete documentation
- Store your credentials securely
Can I customize the Llamalitica interface?
Yes, through the UI configuration object you can customize several aspects:
- Component visibility
- Theme colors
- Default template
- Available features
- Recorder telemedicine mode (video call capture)
What happens if the token expires?
The generated token has a sufficient expiry time for the user to reach the Llamalitica page. Once on the platform, you do not need to worry about token renewal, as the web application itself manages and renews tokens automatically to keep the session active.
How do I handle errors?
Implement error handling for API calls and verify HTTP status codes:
- 401: Invalid or expired token
- 402: Insufficient credits
- 404: Resource not found
- 500: Internal server error
Support
For any questions or issues during the integration, you can:
- Check our complete API documentation
- Contact our technical support